Our Auckland office recently moved to a new building to give us the extra space we needed as the company continues to grow. This move offered a unique opportunity for us to practice what we preach and put our digital solutions to work!
Although our office move was only 500m up the road, the task offered some significant logistical challenges. We had specific requirements for the fit out of the new office which included new office space, warehousing, a smart new Showroom and a state of the art Service Centre.
From the beginning we decided to approach the new design with an open mind, we needed a space that suited our requirements now and factored in room for future growth.
Step 1 – Capture existing asbuilt condition
The first stage in our scan to BIM journey was to capture the existing conditions and dimensions of the new building so that we could produce a 3D model and see what our options where for the fit out.
The Leica RTC360 laser scanner was the perfect tool for this task, allowing for rapid image and point cloud capture. Fast forward 2.5 hours, 63 setups and over 700 million points later we had captured a fully coloured point cloud of the entire building inside and out.

Step 2 – Data registration
The RTC360’s unique onboard Visual Inertial System (VIS) which tracks its position and surroundings when moving between scan was a great advantage as it ensures the scans are correctly positioned relative to each other. VIS is operational whilst the scan is in process so it is constantly working in the background and stitches all the scans together once scanning is completed.
With many other laser scanners, it’s the registration of the data that takes the most time. This is not a problem for the RTC360, the pre-registration of scans onsite dramatically sped up our end to end workflow.
The next step was to use Leica Cyclone Regsiter360 desktop software to check the data, close any loops (closing loops make the data more robust) and apply it to a control network.
The speed of this workflow meant that we had a coloured, geolocated, registered point cloud exported in around half a day.
Step 3 – Build the 3D model
We modelled the existing building in Autodesk Revit to use as a base for our fit out design and project collaboration. Utilising the CloudWorx for Revit plugin we were able to maximise the value of the point cloud inside Revit while extracting the building details.
As Leica’s LGS file format is compatible with CloudWorx, we could easily access the imagery and tags from site to assist in the modelling process.
Other features like the clipping tools (for chopping and sectioning the point cloud) and fitting tools (for fitting elements to the point cloud – walls, windows, doors etc) really helped speed up the process of converting the point cloud into a fully fledged Revit Model.
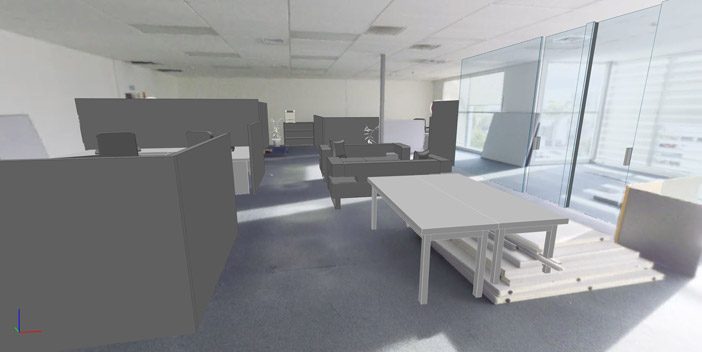
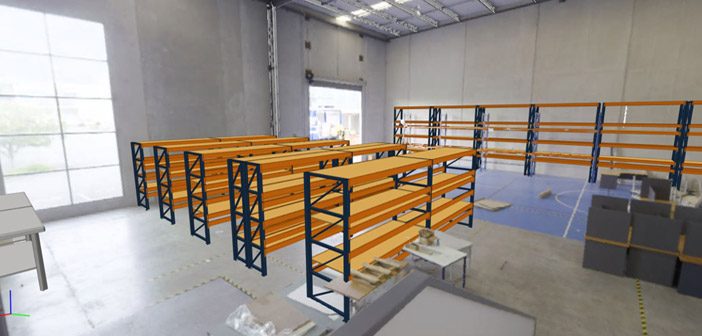
Step 4 – Design the fit out
Once we’d generated our accurate 3D model of the building, we were able to start experimenting with new layouts and ideas for how we wanted to fit out the space. With the new office measuring over 50% bigger than our old office and with lots of scope for design ideas, we were in the fortunate position of being able to reinvent our work space rather than recreate what we already had.
This was a collaborative process across our team and we were able to share ideas using Autodesk BIM360 and the Leica JetStream Viewer.
BIM360 gave us a central project repository allowing us to distribute design options to the team for further discussion. JetStream Viewer enabled us to interrogate the new design ideas from within the 360 imagery, giving the design a stronger realistic 3D visualisation that we could navigate through.
Being able to see the design ideas come to life in 3D generated a lot of discussion and provided our team with the spatial information they needed to make practical decisions.
Step 5 – The fit out
Once we’d reached a point where we were happy with the designs for each area, we distributed the 3D plans to our subcontractors for the fit out to begin. Over the course of a few weeks the contractors completed a comprehensive fit out including building new walls, replacing all the flooring, fitting a second kitchen, an electrical fit out and a major overhaul of the warehouse.
With a wide range of Leica construction equipment at our fingertips we were able to embrace a digital approach to the fit out. For the more precise set out tasks we utilised the Leica iCON iCR60 construction total station with iCON Build software to make sure the positioning of new features [such as walls and racking] was accurate to the design.
This was particularly useful for quickly determining where to place new walls and where to drill to secure the new racking in the warehouse.
![]()
We didn’t have access to any digital records of the building plans from when it was built, so before we drilled into the concrete floor we did a quick scan with the C-Thrue concrete scanner, which using ground penetrating radar to reveal buried structures in concrete.
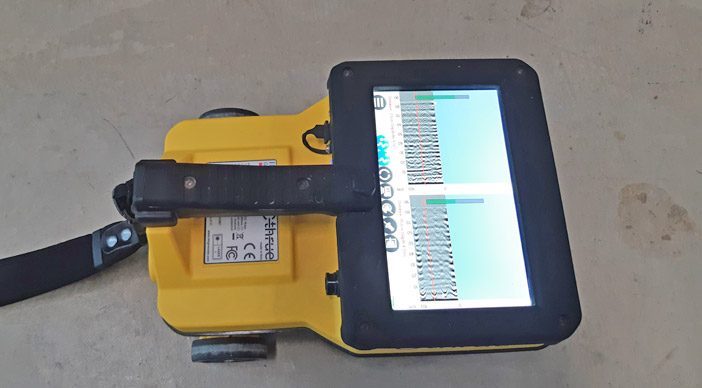
The C-Thrue scanner located all the buried steel and rebar and took the guess work out of knowing where it was safe to drill.
Step 6 – Asbuilt & Digital Twin
Following the fit out we completed a walk-through of the inside of the building with the Leica BLK2GO mobile laser scanner. This took all of 25 minutes over 3 walks to complete and captured over 200 million fully coloured points.
 |
“Although the Leica RTC360 is the world’s fastest terrestial laser scanner, in this instance the BLK2Go was almost 5 times faster in covering the same area. Sure the data is less dense with the BLK2Go but it’s more than enough for the purposes of closing the loop and checking the asbuilt” Tim Jervis – Laser Scanning and BIM specialist, Global Survey |
This is the perfect application for the BLK2GO and demonstrates its strength as a high speed scanner capturing data over a large area whilst in motion. The purpose of this second scan was to check that the fit out had been completed in line with the digital design.
Scan to BIM
Our Scan to BIM journey produced an accurate digital record or “digital twin” of the new building which can be used for years to come. There are many options for users in terms of equipment, software and workflow, this was our chosen Scan to BIM journey and is just one example of how this technology can be applied.
Our Auckland team are well settled in their new space now. The big winners from the move are our smart new Showroom and custom designed Service Centre which we set up to maximise efficiency. The growing Survey and Machine Control divisions gained well-equipped warehouse and workshop areas with plenty of room for our specialist teams to work in.
We were at the last office 16 years so it’s likely we’ll be here for many years to come!
If you’d like to learn more about any of the processes in this article, reach out to Tim Jervis:
tim@globalsurvey.co.nz
Or connect with Tim on LinkedIn for regular scanning and BIM information.
SHARE THIS ARTICLE