
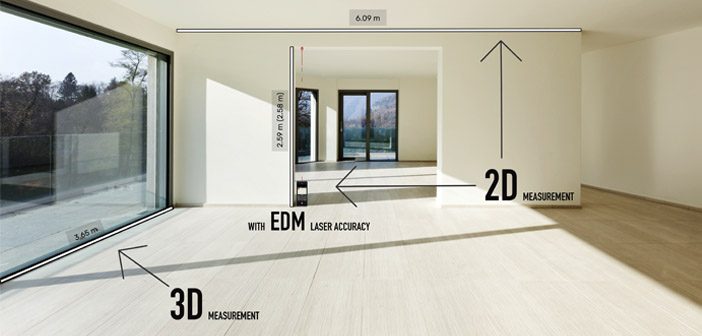
The new Leica BLK3D creates images that contain precise three-dimensional measurements. Understanding how measurements are calculated will ensure you’re getting the best results from your Leica BLK3D.
In this article we aim to explain how to create in-picture 3D measurements with optimum accuracy and go through some of the considerations to keep in mind.
Accuracy Best Practices
The accuracy of the Leica BLK3D in-picture measurement is influenced by four variables:
- Distance to the object being measured.
- The baseline between the 3D images used to calculate the measurement points
- The orientation of the camera to the object being measured
- Light conditions, structure and texture of the object
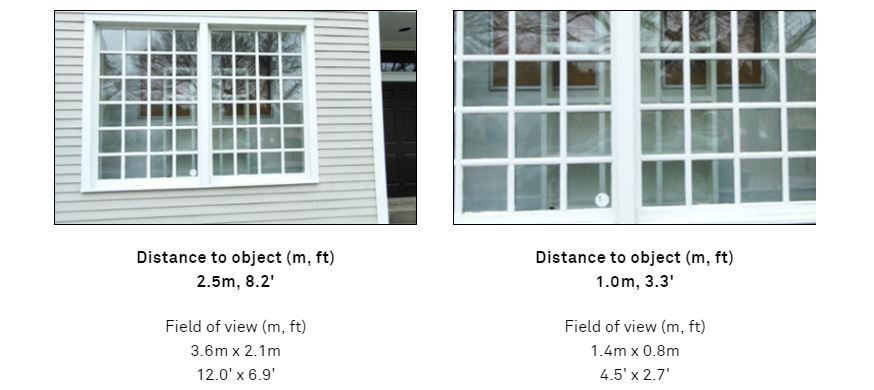
Stay Close To The Object
The closer you are, the more accurate your measurements will be:

Note: Accuracy shown are one sigma (1σ)
For reference, the following four images were taken at the distances referenced in the chart above:
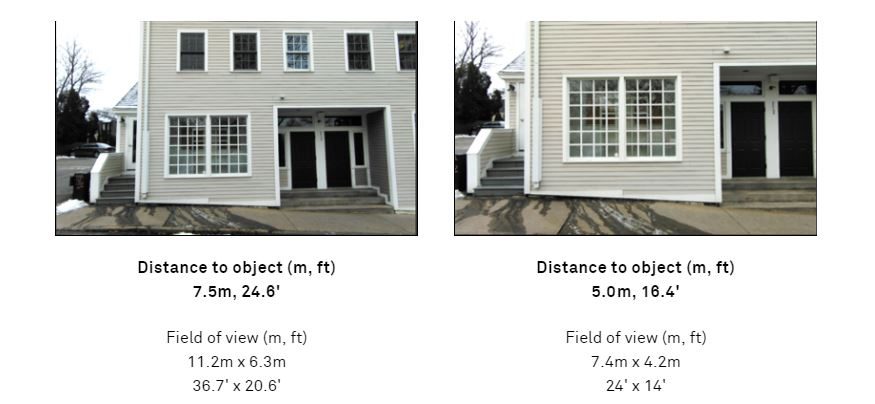
Due to the BLK3D’s wide field of view, we recommend keeping the distance to your object below 7.5m. An image taken from 7.5 meters will have a 11m wide field-of-view. At 7.5m distance, the measurement deviation can range between 10 – 35mm (0.1% – 0.4%)
Double Up For Best Results
The gray line in the accuracy table above is for a “single shot”. Beyond 2 meters the accuracy of a single shot degrades rapidly as distance to the object increases.
The orange and green lines show how much accuracy can be improved using the “multi-shot” technique.
To take a multi-shot:
- Take your first 3D image.
- Take a step sideways.
- Take a second 3D image of the same area.
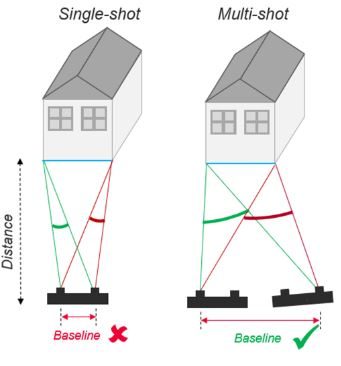
The side step only needs to be approximately 10% of the distance to the object (5m distance – 0.5m side step). A second set of 3D images provides the Leica BLK3D with a longer baseline, improving the accuracy of the photogrammetry algorithms used to calculate measurements.
The second 3D image adds only a moment to the capture process and significantly improves the accuracy of any measurement taken with the Leica BLK3D. The multi-shot capture method is strongly recommended when creating 3D models.
Favorable vs Unfavorable Conditions
The graph above features two multi-shot specifications: Favorable (green line) and Unfavorable (orange line) conditions. Favorable vs Unfavorable is literally a study of contrasts: The more contrast in light and color that you have between the line you are measuring and the background, the better.
When it comes to contrast, lighting is the most important aspect of the environment that you can potentially control.
If you are indoors, we suggest using the built-in LED Flash. In darker areas, an attachable LED light is available (Article Number 870778). Adding light, and correctly adjusting the exposure, will yield an image with better contrast and produce the best possible results.
Keep To The Middle
Measurement points within the middle 50% of the 3D image can be more accurate than “edge to edge” measurements. For best results, try to keep the area that you are measuring in the middle 50% of the screen when you capture an image.
Getting the best results from the Leica BLK3D is similar to how we get the best results from a smartphone camera in different situations.
For example: When I take a picture of a document with my mobile phone, I don’t stand halfway across the room and hope that I can zoom-in enough later to read the words on the page. I get up close and I orient my phone in the same direction as the page, so that everything is straight and clear for when I need to read it later.
This is exactly how you can think about the Leica BLK3D. There is no doubt that you will be able to get results from images taken from further away, but the closer you are, the more accurate the results will be.
Top Tips For Highest Accuracy
- Get the proper amount of light on your subject. Activate the built-in LED flash or the optional LED lamp accessory. Avoid under or over exposure.
- Always take a second 3D image (multi-shot) of the area of interest. You need only step to the side 0.5m (1-2’), or 10% of the distance to the object you are measuring. This capture process literally takes a few seconds. Ensure that all the objects you want to measure are in all the shots you take.
- If you have a large area to measure, break it down into a few smaller areas. You will get better resolution, sharper details and better accuracy. Image capture is very fast and the BLK3D has 64GB memory and fast USB-C download.
- For critical measurements, dedicate a separate multi-shot. The best accuracy is obtained by keeping the measurement in the center 50% of the imager field-of-view and orienting yourself perpendicular to the object of interest. For the highest accuracy, the integrated laser electronic distance meter (EDM) of the BLK3D will typically measure within +/- 1mm. A laser EDM measurement can be attached to an in-picture measurement in the field using the Tools menu on the BLK3D.
- A stable device produces the best 3D images. When accuracy is paramount use a tripod, monopod and/or the built-in timer function to stabilize the device.
Learn More: Watch this Webinar Recording
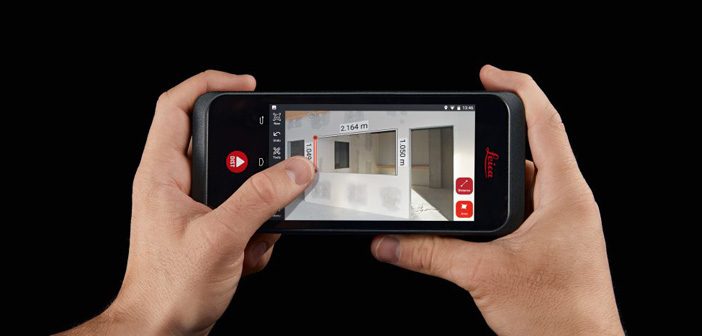
Leica BLK3D: Real-time, in-picture 3D measurement.
Many different industries are experiencing a shift towards digital workflows. The Leica BLK3D combines measurement sensors, software, and on-device edge data processing capabilities to make in-picture measurements in real-time possible. Every image captured is a complete and precise 3D measurement record.
Watch the webinar recording
(The webinar took place on the 27th March 2019 and the recording is now available to watch on demand)
Contact our Reality Capture specialists if you’d like to know more: info@globalsurvey.co.nz
SHARE THIS ARTICLE